
📋 What you can do
With a Client Folder, you can:
✅ Create a Client Folder with the traveller information already available✅ Set up the trip language and room composition
✅ Add travellers and assign them to rooms
✅ Add traveller details progressively as information becomes available
✅ Save the Client Folder even when some traveller information is still missing
✅ Complete or update traveller information later
✅ Keep the Client Folder active while creating bookings or designing a trip
🎯 Objective: Learn how to create a Client Folder progressively using the traveller information available at creation, complete missing details later, and use the newly created folder as your active Client Folder for bookings and trip design.
🗂️ Create a new Client Folder
After logging in, you are automatically directed to the Client Folder list. The Client folder section is already selected in the menu.
- Click the New client folder button
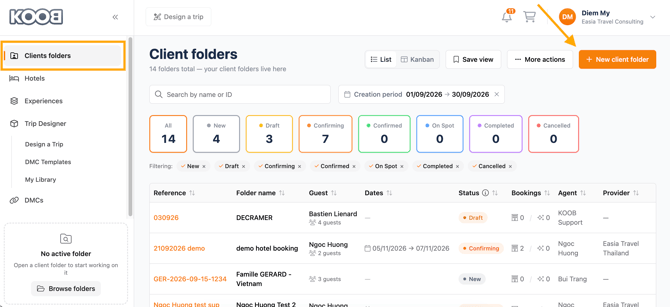
- A pop-up window appears, allowing you to create a new Client Folder
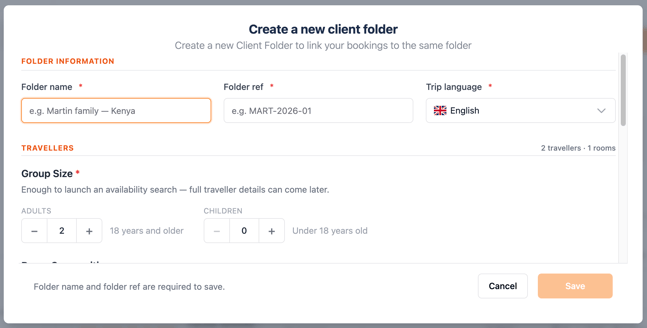
-
In the creation form, mandatory information is clearly indicated.
-
You can enter the information available to you
📁 Folder Information
In the Folder Information section, enter the basic information used to identify and manage the Client Folder.
- Client Folder Name – 🔴 Mandatory
Enter a name to identify the Client Folder. - Internal Client Reference – 🔴 Mandatory
Enter an internal code used to track and identify the client or Client Folder within your organisation. - Trip language – 🔴 Mandatory
Select the default language for the trip. This language will be used when the TO designs a trip from this Client Folder.
👥 Travellers
The Travellers section allows you to define the group size and add the travellers included in the Client Folder.
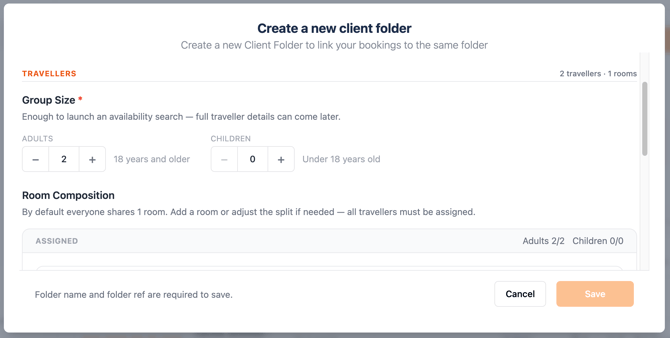
👨👩👧👦 Group size
-
Group size is 🔴 mandatory.
-
By default, the group contains:
- 2 adults
- 0 children
-
You can adjust the number of adults and children according to the group.
💡 The number of travellers can be adjusted as needed, with the following minimum values:
- Adults: at least 1
- Children: 0 or more
👶 Children
-
When you add children to the group, you need to provide their age information.
-
For each child, you need to provide either their exact birth date or their age.
-
You can switch between the two options by clicking the I only know the age / Use exact birthdate button:
- 📅 Use exact birthdate – Enter the child's exact birth date.
- 🎂 I only know the age – Enter the child's age.
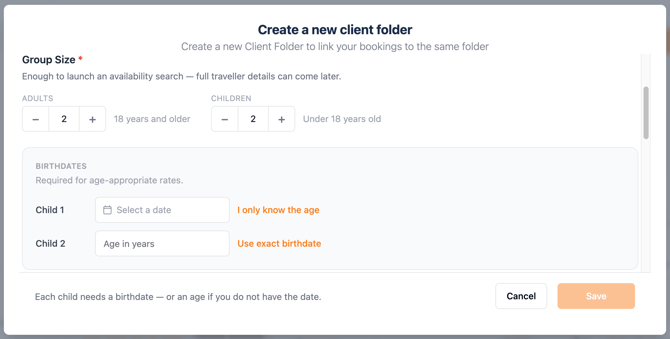
⚠️ This information is required for children before you can save the Client Folder.
🛏️ Room Composition
Room Composition is ⚪ optional.
By default, all travellers added to the Client Folder are assigned to one room.
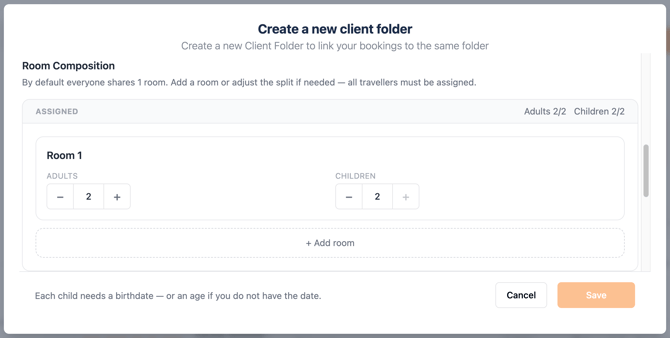
You can:
- ➕ Add additional rooms.
- ➖ Remove rooms.
- 👤 Assign or reassign travellers to different rooms.
The room composition should match the Group size defined above.
⚠️ If the room composition does not match the number of adults and children in the group, KOOB displays a warning:
This doesn't match the X adult / Y children travellers on this trip — assign them all to rooms.
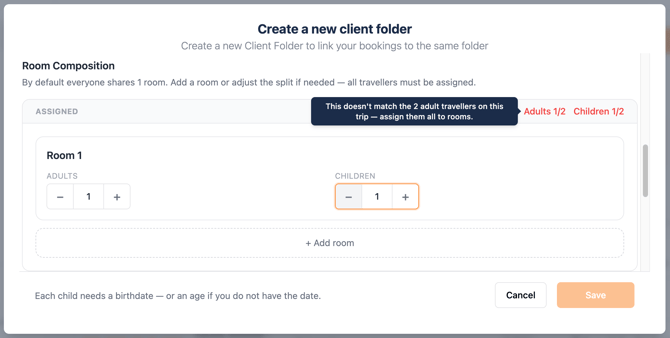
👉 Adjust the room composition and assign all travellers to the appropriate rooms to resolve the warning.
👤 Traveller details
The Traveller details section is ⚪ optional.
You can complete the traveller information when creating the Client Folder, or add the information later when you receive it.
💡 KOOB recommends completing the traveller information whenever you have it, especially before booking or designing a trip:
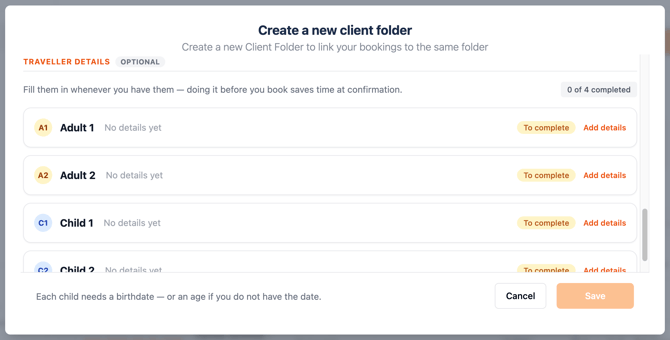
Fill them in whenever you have them — doing it before you book saves time at confirmation.
📊 Track completed traveller information
At the top-right corner of the Traveller details section, you can see the number of travellers whose mandatory information has been completed, out of the total number of travellers in the group.
For example:
1 / 3 travellers completed
This allows you to quickly see how many travellers still need their information to be completed.
✏️ Add traveller details
-
For each traveller, when the required information has not yet been completed, the status is displayed as To complete.
-
Click Add details to open the traveller details section and enter the information for that traveller.
-
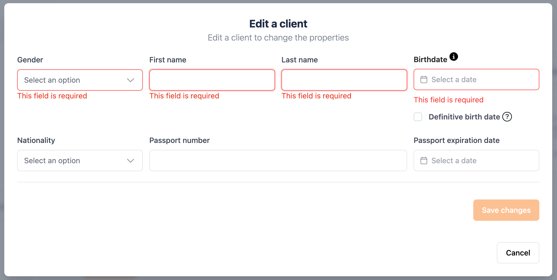
There are 4 mandatory fields:
- Gender
- First name
- Last name
- Birth date
-
There are also 3 optional fields:
- Nationality
- Passport number
- Passport expiration
✅ A traveller is considered completed once all 4 mandatory fields have been filled in.
The traveller's status then changes from To complete to Completed.
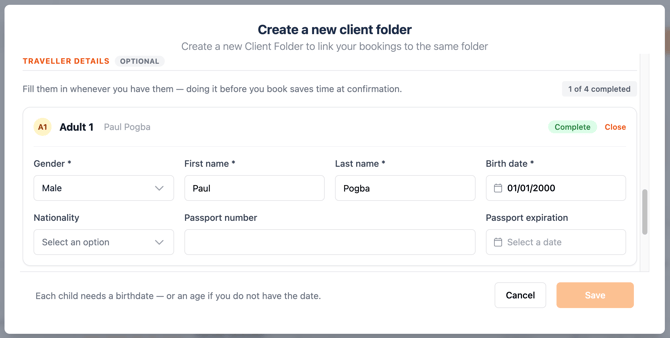
💡 You do not need to complete the optional information to change the traveller's status to Completed. You can add or update this information later when it becomes available.
💾 Save the Client Folder
At the bottom of the pop-up, you can find two options:
- Cancel – Click Cancel if you want to cancel the creation of the Client Folder and close the pop-up.
- Save – Click Save to create the Client Folder.
🔒 The Save button is enabled only when all mandatory fields, marked with a red asterisk (*), have been completed in the sections above.
Once all mandatory information has been provided, click Save to officially create the Client Folder.
💡 Remember that Traveller details are optional. You can save the Client Folder without completing all traveller information and update these details later.
🎉 Client Folder created
-
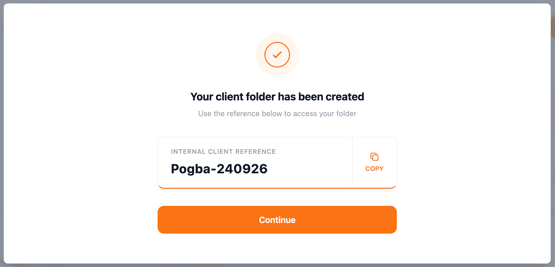
Once you click Save, a confirmation message appears:
Your client folder has been created
-
Click Continue to open the newly created Client Folder.
🔗 Client Folder created and linked
After clicking Continue, KOOB opens the newly created Client Folder.
You will see two confirmation messages:
- Client folder created and linked
- Now working on [Client Folder name]
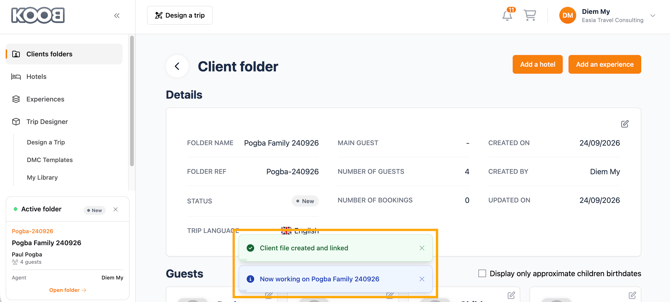
This means that the newly created Client Folder is now your active folder.
While this Client Folder is active, any new:
- 🏨 Hotel bookings
- 🎟️ Experience bookings
- 🗺️ Trip designs
will be linked to this Client Folder.
💡 The active Client Folder helps ensure that the bookings and trip you create are associated with the correct client.
✏️ Managing your Client Folder
After clicking Continue, KOOB automatically opens the Client Folder you have just created.
Once a Client Folder is active, it is displayed in the bottom-left corner of the screen.
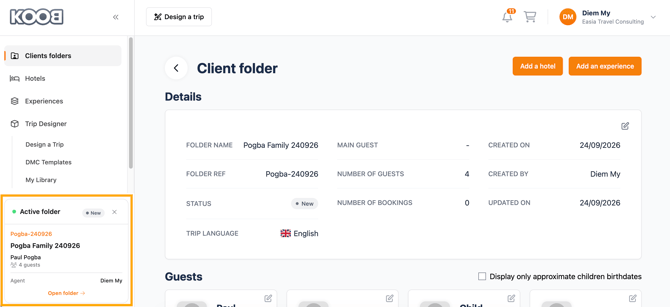
As long as the Client Folder remains active, new bookings and trip designs you create will be linked to this Client Folder.
Once you open the Client Folder, you can access three sections:
- Details
- Guests
- Bookings
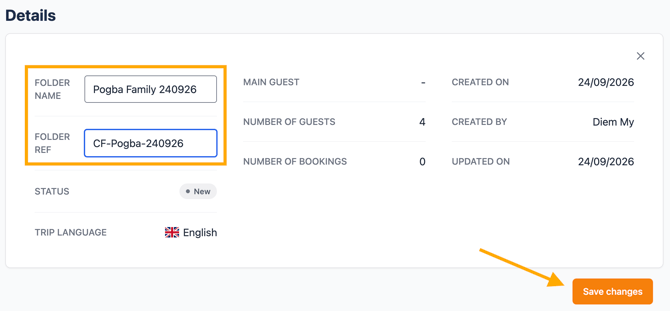
📁 Edit the Client Folder details
In the Details section, click the ✏️ pencil icon in the top-right corner of the block to edit the Client Folder information.
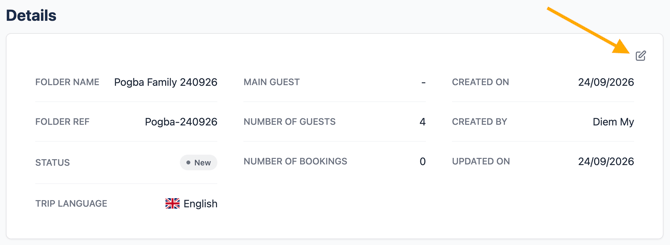
You can update the following fields:
- Folder Ref
- Folder name
🔒 The other fields in the Details section cannot be edited.
Once you have made your changes, click the Save changes button to save them.
👤 Edit traveller information
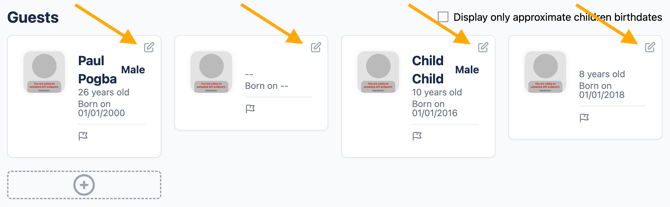
In the Guests section, each traveller is displayed in an individual card.
To edit or add information for a traveller:
- Click the ✏️ pencil icon in the top-right corner of the traveller's card.
- Add or update the traveller's information.
- Click Save changes to save the updated information.
If you do not want to keep your changes, click Cancel to discard them.
You can also add a new traveller to the Client Folder:
- Click the + button in the Guests section.
- Enter the required traveller information, following the same process described above.
- Click Save changes to add the new traveller.
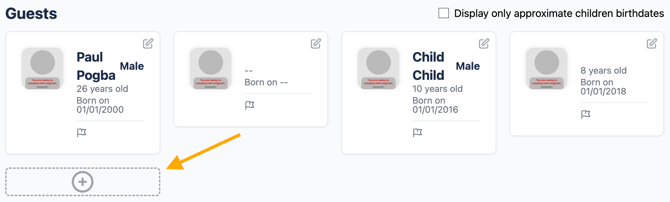
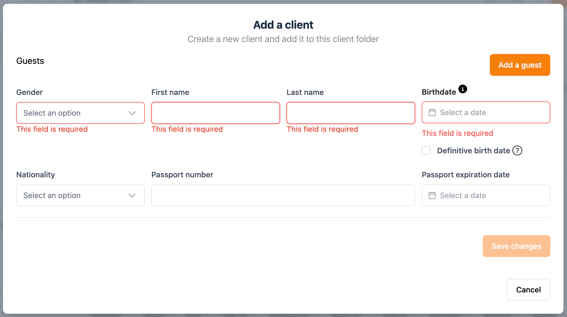
💡 The same traveller information requirements apply when adding a new traveller.
✅ Once the changes are saved, the updated traveller information is displayed immediately on the traveller's card.
🔎 Searching and accessing Client Folders
You can access a client folder from the Client Folder list and update the folder and traveller information whenever needed.
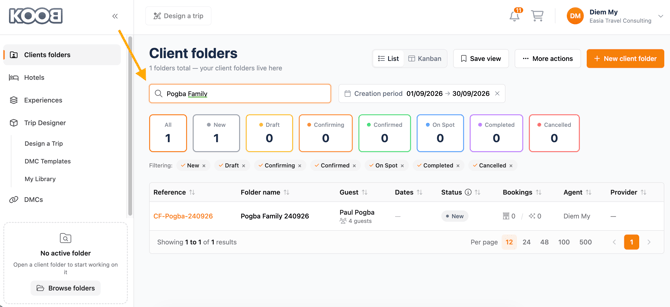
🔍 Search by keyword
In the search box, you can search for a Client Folder using:
- Client Folder name
- Client Folder reference
- Guest name
- Creator's name (Agent)
Enter the relevant information in the search box to display matching Client Folders.
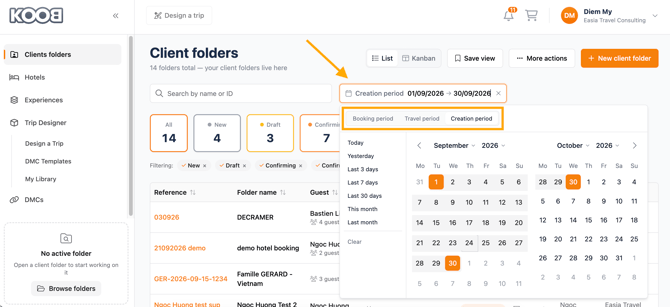
📅 Narrow the search by booking period
You can narrow down your Client Folder search by selecting one of the following period types:
- Booking period – Search based on the date of the first booking made in the Client Folder.
- Travel period – Search based on the starting date of the trip.
- Creation period – Search based on the date the Client Folder was created.
Select the period type you want to use, then choose the corresponding date range to narrow down your search results.
📂 Access a Client Folder
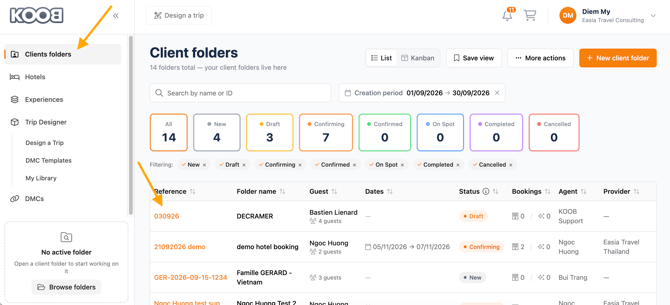
To access a Client Folder:
- Click Client Folder in the menu.
- From the Client Folder list, click the corresponding line to open the Client Folder you want to manage.
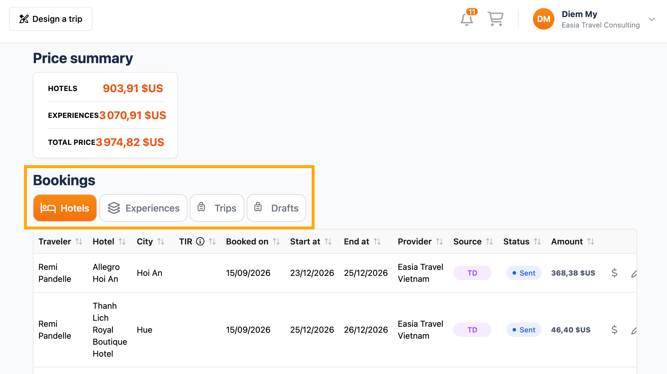
Key sections inside a client folder:
| Section | Content |
|---|---|
| 🏨 Hotels | All hotel bookings associated with the Client Folder |
| 🎟️ Experiences | All program bookings associated with the Client Folder |
| ✈️ Trips | Itineraries created by the Tour Operator for the client |
| 📝 Drafts | Saved trip versions that have not yet been finalized or booked by the Tour Operator |
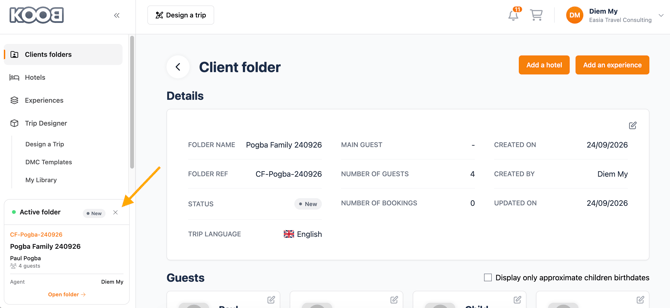
When you no longer want to work on this Client Folder:
- Click the X button next to the active Client Folder.
- The Client Folder is no longer active.
- New bookings and trip designs you create will no longer be linked to this Client Folder.
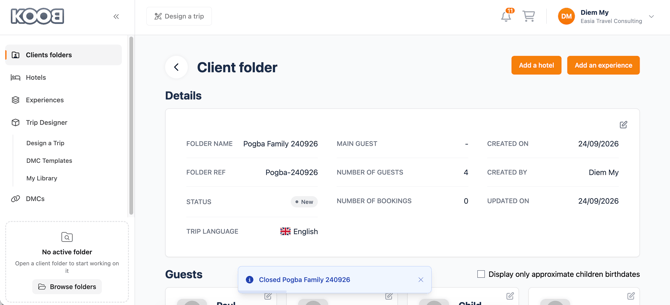
You will see the following confirmation message:
Closed [Client Folder name]
You can then select and open another Client Folder whenever you need to work on a different client.
📌 Example:
For a honeymoon package to Thailand:
-
Hotels: Novotel Bangkok, Mandarin Oriental Chiang Mai, and Radisson Krabi
-
Experiences: Bangkok 3 days, Cooking class, private island tour
-
Trips: Full itinerary (confirmed)
-
Drafts: An alternate/previous version of the itinerary if not confirmed as a Trip
🚀 Next steps after creating a folder
Once your Client Folder is created, you can start planning and managing the client's trip:
✅ Click Design a trip to create a personalized itinerary.
✅ Add hotels and experiences directly from the Client Folder.
✅ Modify bookings or update traveller information whenever needed.
Takeaways
✅ A client folder centralizes all trip elements for one client
✅ It includes tabs for Hotels, Experiences, Trips, and Drafts
✅ Guest and folder information can be edited anytime
✅ Passport info is optional but useful for international travel
✅ All communication and updates are stored inside the folder
FAQ
Can I rename a client folder after creation?
✏️ Yes, click the pencil icon at the top of the folder to rename or update the reference.
Can I create multiple trips in one client folder?
🗺️ Yes! A folder can store several itineraries, each with its own bookings and drafts.
Can I edit guest details after the folder is created?
👤 Yes, guest information is editable until the trip is confirmed.
Is it mandatory to enter passport details?
🛂 No, but it’s recommended, especially for trips involving international travel or visas.
Can I see the status of each booking?
📋 Yes, all bookings inside the folder display statuses like Confirmed, Pending, or Canceled.
Related articles
- How to book Hotels on KOOB ?
- What do the different hotel booking statuses mean (confirmed, on request, refused, etc.)?
- How to link a hotel booking to a Client Folder?
- How to handle Promotions and Supplements when booking Hotels?
- How to access the details of a hotel?
- How to modify a hotel booking as a TO?
- How to cancel a Hotel booking?
For further help, visit the KOOB Knowledge Base or contact KOOB Support 🚀