
✅ Apply pricing margins and visibility settings in bulk.
✅ Save time by managing multiple TOs and products at once.
✅ Ensure consistency in pricing and product distribution across TOs.
🚀 Objective: Streamline the distribution setup process by making large-scale adjustments quickly and efficiently.
📌 Note: Bulk Edit is designed for mass distribution settings. If you need individual TO adjustments, refer to "Standard Distribution Setup".
Accessing Bulk Edit distribution
To begin configuring your bulk distribution settings:
- Entry 1:
- Go to the “Distribution” section, then select the “Connections” submenu from your KOOB dashboard.
- Click on “Bulk Edit” at the top of the page.

- Entry 2:
- Go to the “Distribution” section, then select the “Bulk Edit” submenu from your KOOB dashboard.

- A new interface appears, allowing you to edit Hotels, Experiences, and Trips across multiple TOs simultaneously.

💡 Tip: You can still make detailed individual edits per TO if needed. See the Standard Distribution Setup guide for more details.
Understanding the Bulk Edit interface
The Bulk Edit distribution panel is divided into multiple sections to help you quickly filter, edit, and apply settings.
📌 Symbol Guide for Distribution Setup in KOOB:
| Symbol | Meaning |
|---|---|
| 🛏️ | Hotel Distribution (Selected TOs for Hotel distribution) |
| 📚 | Experience Distribution (Selected TOs for Programs, Activities, Extras) |
| 📄 | Trip Template Distribution (Selected TOs for Trip templates) |
💡 These icons help you quickly identify which product type you are managing in the distribution settings.
Filtering & Searching for Tour operators
To find specific TO, use the filtering options:
- Select the Tour Operators for the Bulk Edit settings.
- Filter by TOs, distribution type (Hotels, Experiences, or Trip Templates), or market.
- Search by name of the Tour Operator OR select the market for which you wish to set up mass distribution.

Selecting the Product Type
- At the middle of the Bulk Edit screen, select which type of products you want to manage:
- Hotels
- Experiences
- Trips (Templates)
Each selection will load the corresponding list of products for bulk configuration.

1) Steps to configure Hotel distribution in Bulk
Filtering & Selecting Hotels
- Select the Tour Operators with the symbol 🛏️ at the top.

- Filter hotels by city, region, ranking, typology, or name.


- At the bottom of the page for hotels, experiences and templates, you can use the pagination at your disposal to display the results as you wish.
- By entering the number of products you wish to see per page
- By navigating through the pages

- In this example, I want to set up bulk distribution for :
- 2 Tour Operators: KOOB for TO Demo and Tour Operator Travel.
- I want to add a margin for 5-star hotels in the Chiang Rai region.
- I will add 15% margin on these hotels.

- Click on the select all button. Hotels will be selected in bulk on this selection.
You'll see "3 selected" in gray.

At any time, if you need to double check the selection of hotels, you can use the filters at your disposal.
- All : displays all (selected and not selected hotels)
- Selected : displays only your selected hotels
- Not Selected : displays all the not selected hotels

💡 Tip: If you wish to remove the selection and start again from scratch, click on Deselect all.
Applying Hotel margins
-
Go to the "Update Selection" section.

- Here you can set various parameters
- Choose between Percentage (%) or Fixed Amount.
- Enter the margin value.

-
- Hotel visibility: visible, invisible

📌 Note:
The “No change” you see, either at this section or in the hotel list below, allows you not to update existing configurations. In fact, if you have already set margins, you can select "no change" so that the update does not affect a selection of hotels or specific hotels.
- In this example, I'm going to allocate a 15% margin to these selected hotels.
- Click on "Apply to selected". The margin will be applied instantly.

Distributing Hotel Contracts
If you wish to distribute only certain rooms and differentiate margins to selected clients in the top section, click on the bed symbol.- Click on the Bed Icon 🛏 next to a hotel.

- Select:
- Room types available for the TO.
- Periods for which the TO can book.
- A pop-up window opens.

- Here we will set the Superior Room "invisible" because we don't want to distribute this room category.
- We also want to change Deluxe margin to 20% on all valid periods of the contract.

- We can also set different margins for the same room depending on different periods:

📌 Note :
- With this feature, you can modify your margin according to the periods of the contract loaded. This is very useful if you need to play with the seasonality pricing.
- “No change” means that the configuration you have set previously with the “Update Selection” remains unchanged: in the example, the margin is 15%.
- Once you’ve finished the room's parameters:
- Click outside the pop-up, the data will be saved.
- Click outside the pop-up, the data will be saved.
Distributing Contracts
KOOB also allows you to distribute all the contracts loaded or a selection.
- Click on the Contract Icon 📜 next to a hotel.
- Select the contracts you want to make available for the TO.

A pop up window will appear with the published contracts available for this hotel in the Catalog.
📌 Example: If a hotel has 2024 and 2025 rates, you may choose to distribute only the 2024 rates while keeping 2025 rates hidden.

Once you’ve finished the contract’s parameters, click outside the pop-up, the data will be saved.
- Click "Apply to Selected" to pre-validate changes.
- Click "Apply Modifications" to save the settings.

📌 Tip : The Button : “Reset Form” allows you to reset the client's selection.
2) Steps to configure Experiences distribution in Bulk
Filtering & selecting experiences
- Select the Tour Operators with the symbol 📚 at the top.

- Click on Experiences section

- Filter Experiences by name or typology (e.g., Transfer, Activity, Extra, Program).

- If you click the “Select all” button, experiences will be selected in bulk. You’ll see “100 / 239 selected” in gray, meaning 100 experiences are selected out of a total of 239.
- Select multiple Experiences by clicking the checkbox

At any time, if you need to double check the selection of Experiences, you can use the filters at your disposal.
- All : displays all (selected and not selected Experiences)
- Selected : displays only your selected Experiences
- Not Selected : displays all the not selected Experiences
📌 Note : If you wish to remove the selection and start again from scratch, click on Deselect all.
Applying Experiences margins & visibility
- Go to the "Update Selection" section.

- Choose between Percentage (%) or Fixed Amount.

📌 Note: the “No change” you see, either at this section or in the Experience list below, allows you not to update existing configurations. In fact, if you have already set margins, you can select "no change" so that the update does not affect a selection of specific experiences.
Here for example, I'm going to allocate a 15% margin to these selected Experiences.
- Enter the margin value.
- Set visibility as “Visible”.

- If you wish to differentiate margins to selected clients in the top section, you can directly update the experiences.
- For example, on the 2nd experience, I prefer to apply a margin at 10%.

- When you are finished with the settings of Margin :
- Click on “Apply Modifications” a message will appear indicating that it’s saved.
- Click on "Quit" if you wish to leave this page.
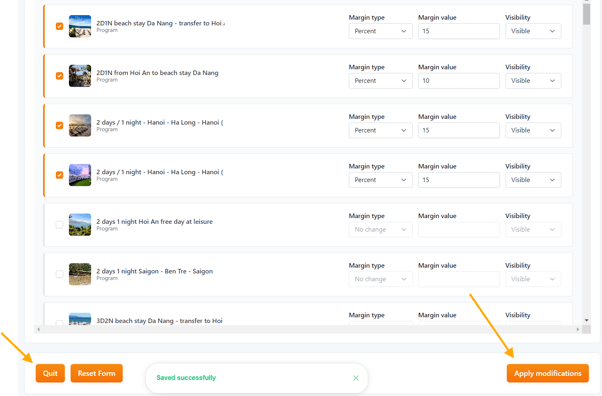
📌 Tip : The Button : “Reset Form” allows you to reset the client's selection.
3) Steps to configure Trip Templates distribution in Bulk
Filtering & selecting experiences
- Select the Tour Operators with the symbol 📄 at the top.

- Click on Templates section

- Filter Templates by name or "Favorites".
💡 Tip : To facilitate selection and search, a search bar is available by name. There are also filters to help you, such as All templates or Only your Favorites of your Catalog.
- If you click the “Select all” button, templates will be selected in bulk. You’ll see “40 / 40 selected” in gray, meaning all 40 templates are selected out of a total of 40.

- At any time, if you need to double check the selection of Templates, you can use the filters at your disposal.
- All : displays all (selected and not selected Templates)
- Selected : displays only your selected Templates
- Not Selected : displays all the not selected Templates
If you wish to remove the selection and start again from scratch, click on Deselect all.
Applying Templates margins & visibility
- Go to the "Update Selection" section.


📌 Note: The “No change” you see, either at this section or in the Templates list below, allows you not to update existing configurations. In fact, if you have already set margins, you can select "no change" so that the update does not affect a selection of specific Templates.
- Here for example, I'm going to allocate a 5% margin to these selected Templates.
- Choose between Percentage (%) or Fixed Amount.
- Enter the margin value.
- Set visibility as “Visible”.
-
Click on "Apply to selected". The margin will be applied instantly.

- If you wish to differentiate margins to selected clients in the top section, you can directly update the Templates.
- For example, on the 2nd Template, I prefer to apply a margin at 10%.

📌 Important: Trips are already marked up based on Experience pricing. If you add a markup at the Template level, it will be added on top of the Experience margins inside the Trip.
- When you are finished with the settings of Margin :
- Click on “Apply Modifications” a message will appear indicating that it’s saved.
- Click on "Quit" if you wish to leave this page.
📌 Tip : The Button : “Reset Form” allows you to reset the client's selection.
VIDEO TUTORIAL
Takeaways
✅ Saves Time → Apply changes to multiple TOs in seconds.
✅ Ensures Consistency → Standardize pricing and visibility across TOs.
✅ Enhances Control → Adjust rooms distribution, contracts, margins at scale.
✅ Improves Accuracy → Reduce errors by modifying multiple settings in one step.
🚀 Next Step: Now that your bulk distribution is configured, your TOs can start making bookings immediately! 🎉
FAQ
Q: Can I apply different pricing for different TOs?
✅ Yes! Each TO can have a custom markup per product type.
Q: What happens if I deny a TO's request?
✅ They won’t be able to book, but can still see showcase products.
Q: How can I edit margin settings later?
✅ Go to Distribution per TO and adjust visibility or markups : How to set up Hotel, Experience, and Trip Distribution for a Tour Operator? (Detailed configuration)
Related Articles
- How to set up Hotel, Experience, and Trip Distribution for a Tour Operator? (Detailed configuration)
- How to use the Bulk Edit distribution settings for my products?
- How to set margins and visibility for my distributed Hotels?
- How to set margins and visibility for my distributed Experiences?
- How to set up margins and visibility for my distributed Trips templates?
- How to set up currency exchange rates for my distribution?
- How to manage last-minute booking restrictions for Tour Operators?
- What do "Showcase" Hotels and Experiences mean?
- Where can I check and set up the cancellation policies of my products?
- How to manage Tour Operator connection requests ?
📌 Need help? Visit our KOOB Knowledge Base or contact KOOB Support for assistance. 🚀